Showing posts with label anchor charts. Show all posts

Saturday, May 9, 2015

Filling Buckets with Class Books {Love Notes}

Hi, Friends! Long time, no blog! We’re down to the final stretch of the school year and things are starting to clear away a little….we have exactly 18 days left! 18! That’s it!

While it’s hard to believe that we ARE actually in the days of the final countdown, we have worked hard as a little school family and are ready for some rest and relaxation! I’m linking up with my bud, Kacey for a Five for Friday bucket filling idea!

Slide1

As we’re winding down the final six weeks, our focus in writer’s workshop is creating class books. By doing so, we can review a number of topics in a fun way that the kids can’t wait to get their hands on. Alliteration. Rhyming. Phonics patterns. Conventions. Punctuation…..BUT, most of all….filling buckets and continuing to build our classroom community right up until the very last minute!

Like normal, I gave my littles a voice in the planning of this endeavor. We brainstormed a list of topics they’d like to write about. After compiling the list, students voted to choose their ‘Top 3’ ideas. To my surprise, their #1 choice was little ole ME! I have the best class of littles on the planet, but it can be a little scary to give them free reign to write a book about YOU! =)

After a little prayer…..and prepping a cover… [Yep, they told me EXACTLY what they wanted on that too!]…the kids set to work with a starter sentence to give the book a little rhythm. The starter sentence was……Ms. Dwyer is my teacher. Beyond that, they added anything they liked to describe me as a teacher and tell what or how I taught them in 1st grade. We were reviewing adjectives that week and let me tell you, those little stinkers made me cry! Like….for REAL TEARS!!! I cried! I tried to wipe them away and play it off, but ya’ll, the things they said were so heartwarming…..and I’m a big ole softie when it comes to my kids…..melted my heart as I read every page! That little book is one I’ll treasure for a long, long time!

….and just like THAT, one idea birthed ANOTHER!

friendsFREEbie1415-TDwyer

It started with bringing adjectives to LIFE! We used one courageous friend as a living anchor chart! This brave little stood at the carpet, glowing from ear to ear as friends used adjectives to describe HER. As they provided adjectives, I jotted them down quickly and we labeled away!

Slide3-TDwyer

We couldn’t exactly leave her there standing all day, so we created a “Flat Stanley” version and placed the sticky notes on the chart. After the adjectives were added, she got to add a noun under each adjective to name what it was describing. The next day, we used the chart as a class again to review each item students described and how we use adjectives in sentences before beginning a surprise project! It was super top secret and we had a limited amount of time to get it down while our friend was out of the classroom!

Did you notice the other little book covers on the 1st picture? Well, if my bucket was filled as an adult getting such a sweet gift from my class of littles, I got to thinking about how each of them would feel getting the same thing! So, as one of my littles was out of the room, we each sat down and wrote a note to tell her exactly how terrific she is! As she returned, I projected the book on the document camera and turned the pages. Each student read the page aloud and you could just see the pride and warmth bursting from each of their pores! It was one of the most wonderful things I’ve ever seen as a teacher. To hear each student, one by one, tell a classmate what makes them special…..especially, during the wonky times of these last few days was uh-mazing!!!!

I wish I had taken pictures of the actual book, BUT I think its now under guarded lock and key because the student receiving it LOVED it just that much! Each day from then until the end of the year, we’ve decided to fill a bucket for a friend or two! Love, love, love my littles and the care they show for each other.

Slide4

Our guided reading groups have all blended to form strategy groups. During the first 20 days of school, we worked to build routines to foster a collaborative learning environment. During the final 20 days, students are collaborating and sharing what they’ve learned throughout the year as they review comprehension skills in mixed ability groups. In short, they’re teaching each other! Again…..teacher heart melted!

Slide5

We’ve had a great year filled with lots of learning with great friends! While I get a little teary eyed this time of year, it’s only because I’m so proud of my kiddos. They don’t need me anymore. I’m just in the room to make sure there’s adult supervision. They know the routines because they’ve helped to create them and practiced them all year. They’re working together. They’re teaching each other…..and they’re ready, ready for all 2nd grade has to offer! And me, I’m the lucky one….because I got to be a part of their journey! I got the privilege to make learning fun!

…..and that little book that we created as a surprise? The student receiving it, proudly declared THAT day as the BEST day of her life! She felt special and was stronger than me because she was able to hold back her tears of joy! It’s the little things that make teaching so fulfilling, that remind me daily of why the extra effort to love on each kiddo in my class is the most important part of what I do. It’s what makes the learning possible.
Slide6

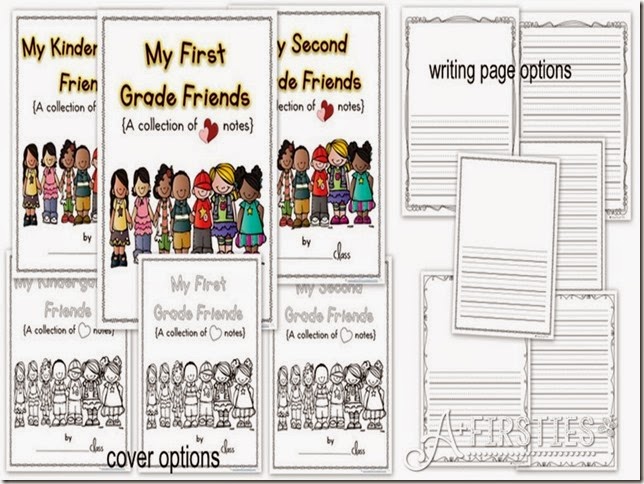
Think your class might like to end the year filling each other’s buckets too? Click the pic above to grab a cover and a writing page insert to use! There are options to print the cover in color or in black in white to be colored. There are also 3 different simple double-sided writing pages to choose from. Enjoy these last few days…summer will be here before you know it!

fiveforfriday2_thumb[3][1]    http://www.teachingblogaddict.com/2015/05/freebie-friday-for-may-8th.html

Thanks for stopping by!

Wednesday, March 18, 2015

Worksheets Don’t Grow Dendrites {Chapter 5 & 6ish}

Hi, Friends! How are ya? I’m excited about jumping into the book study about Worksheets Don’t Grow Dendrites by Marcia L. Tate! While we’ve been enjoying lazy days around the house, I’ve had pen and highlighter in hand busily doodling over the pages as I’m reading. Hopping from post to post to read how this book is impacting other teachers has been inspiring!

When I read Michelle’s post about Strategy 5, I just had to jump in because this chapter addresses a topic that is near and dear to my heart…something we use in our classroom every.single.day. In fact, her chapter kind of incorporated every single chapter leading up to it.

Before I jump into Chapter 5, here’s my big “take away” or “A-Aha!” from each of the previous chapters.

Chapter 1: Brainstorming and Discussion….Classrooms should NOT be quiet places. There should always be a consistent hum or buzz about the room as children are working and learning together. Opening their mouths to talk allows oxygen to get to the brain which in turn allows for a greater depth of learning.

Chapter 2:  Drawing and Artwork…I could write about this strategy all day, every day! Art is not fluff! Can I say that again? Art is not fluff. It’s the stuff…that you can use to your advantage to make many meaningful cross-curricular connections. Art inspires creativity. Art requires creation, problem solving and THINKING. Art inspires deeper learning by engaging all senses.

Chapter 3:  Field Trips…Sadly, the decreasing of school budgets have brought a screeching halt to taking field trips. To improve in this area, we’re going to look for opportunities to learn outside of the 4 walls of our classroom on campus. I’m also going to get with my favorite techy guru to plan a virtual trip! =)

Chapter 4:  Games…I need to use them more. In classrooms full of boys, games are a great strategy for learning because boys are inclined to compete in everything!

NOW…Chapter 5…Graphic Organizers, Semantic Maps, and Word Webs! =)

Slide2
The best classrooms are ones where students are actively engaged in the learning-talking to one another, moving to learn content, connecting ideas together, thinking positively, and having a purpose for learning. ~Marcia L. Tate

Creating graphic organizers incorporates all of these things! Not only are they engaging, but they’re fun! Every Monday, we create a word web together to introduce our phonics focus for the week. The kids get so excited listing words that it’s hard to get them to stop! I LOVE to doodle! Win-win!

While you may not like to draw or are thinking you couldn’t make a stick figure with a ruler….don’t worry! Have a projector? Well, project a picture you’d like to use and trace away. Your kids will never know and they’ll think you’re an artistic genius! Even if you use your own stick figures, they’ll still think you’re an artistic genius!

Slide3
We incorporate guided writing toward the end of every week [during guided reading]. This is how we address our comprehension skill. Graphic organizers help students to represent abstract concepts in a concrete, organized, visual format. The brain remembers images more easily than just words. When graphic organizers are used to change words into images, both left- and right-brain learners can use those images to see the big picture. (Gregory & Parry, 2006)

Each group completes a graphic organizer or responsive writing that is specific to their guided reading book. Here, after students read quietly…we discussed story structure and I wrote what they told me about the book. After I wrote to provide an example for them, students created their own story maps by copying the information in  an attractive, engaging format in their guided writing journals.

Slide4
Same week. Same concept. Two different guided reading groups.

If time allows, students also enjoy sharing what they’ve learned and all students get to experience the gist of each of the different guided reading books that have been used over the course of the week.

Slide5
This is an example of something new we’ve just recently started. As we approach the final six weeks of the school year, our stories are getting harder and much longer. So that students have additional exposure to the story of the week, two of our reading books have been placed in a work station bin for students to read the story independently. After reading the story, there is an 'I Can' statement provided to guide them toward creating their own graphic organizer. Because we’ve been faithfully creating these each week in small group, they’re now ready to make them on their own!

I Can statements don’t always have to be fancy. Sometimes, they can get whipped up from a sharpie and blank sheet of typing paper. The important thing is for students to have an organized model to follow, IF they need it. =)

Slide8
Graphic organizers can take on fun shapes too!

Slide9
In our classroom, kids help create everything. They are much more likely to be engaged and remember what was taught if they have a hand in creating it. Just sitting and watching me have all the fun isn’t actively learning.

Slide7
This year, we’ve also focused on pumping a little life into our graphic organizers! Just like they can take on shape…they can be 3D too! Using 3D graphic organizers lends itself to project based learning….yet another, brain compatible strategy to grow those dendrites!

Slide6
They’re great for every subject area. Again, let kids help create charts! Let them color them, touch them….construct them. Let them guide the creation of them. It’s in the “doing” that they’re learning. If time is an issue, {When isn’t it?} I create the background and the kids add the content.

Slide10
They’re not just for reading! We’ve adapted the Frayer model for tons of uses in math too! We fold and learn a lot! =)

Slide11
We build our classroom community with them as often as possible. This little book is one of my all time favorites! I usually whip it out as we review routines to begin the second semester. One of my coworkers introduced it to me years ago and I’ve been reading it ever since!

Slide1
Here’s my reflection on Strategy 5. I hope you’ve found a little something helpful in this post. I’m looking forward to continuing this book study. Each of the sections I’ve read so far have been a big affirmation of personal beliefs and strategies we’re enjoying in our classroom. It’s also given me a greater understanding of the brain research that supports each of these strategies. Reading this book has allowed me time to reflect over how I can improve those strategies and consider how to add more tools to the “toolbox”.

Strategy 6 is all about the use of HUMOR in the classroom. What can I say? I’m goofy. I have the attention span of a 6/7 year old. I love to laugh! It makes the kiddos and I ooper schmooper compatible. Humor is usually one of the bullets my administrators list as a strength on my yearly evaluation. I think it’s their very nice way of saying…thanks for sharing your goofiness! LOL!

It’s important to love what you do. How else can you express joy, if you don’t enjoy the work you do every day? My BIG TAKE AWAY from Chapter 6? Sarcasm is the opposite of humor. It tears children down and can be demeaning. Don’t use it. While older students or advanced students may be able to get the humor part of it, most young children cannot and it can be damaging to them. Soooo, share a laugh. Wear a funny hat or shirt. Dance! Play! Make a funny face and LOVE what you do!

I hope you’re enjoying this book study as much as I am!

Stop by Fabulous in First to read about Strategy 5 and hop through the links.
Stop by One Extra Degree to read about Strategy 6 and hop through the links.
 
Later, gators!

Friday, November 7, 2014

Five for Friday {Let’s Catch up!}

Hey, ya’ll! I’m FINALLY  coming out of football mom, tired teacher starting the year mode and finding a thing closer to balance! It’s been far too long and I’m dropping in to shoo away all those crickets that have been chirping around the blog! How’ve you been?!

My sonshine played football for the first time this year and let me tell you….IF you’ve never experienced the joy of having a son in a Texas youth football league….it’s taken pretty darn seriously! It was like having a part time job! So, with that being said…I had to take a little break to be present for my favorite player. Noooow, that the season is done, let’s get back to a little blogging fun!
fiveforfriday2_thumb[3][1]

Here’s a little flashback over the last couple of weeks…..

Slide1

This has easily become my favorite quick foldable! We’ve adopted it from the Frayer model. The Frayer model is used for vocabulary development. The middle section houses a word, with the four surrounding sections dedicated to defining the word, listing facts/characteristics, providing examples and listing non-examples. Wellllll, as you can see, we did not use it for vocabulary, but rather used it as a way of visually organizing information on our papers. Could we use it at a different time for vocabulary? Absolutely! I think this quick organizer will be awesome to use for any number of things!

My students and I work and learn best when we’re creating, when we’re involved in the process of learning without the priority being the end product….so we complete a LOT of graphic organizers and foldables. This one provides us with the space to share the focus concept in the center, while dividing our paper into sections to show our learning. We also usually use them front and back. The example above shows how we illustrated 10’s and 1’s, then used the 120 chart to generate numbers.

I prefold the paper for students by folding the paper into 4 squares, then taking the central corner of the paper and folding it down diagonally to create a triangle. When it’s  unfolded, it reveals a rhombus in the middle with the 4 surrounding sections. Students are then instructed to trace the lines of the rhombus….followed by the 4 lines that are north, south, east, and west of it to create the writing spaces.

You’ll definitely see more of this foldable!

Slide2

Place value is a tough concept for little learners, so we use lots of hands on fun and games to practice this skill. On this day, we rolled dice to build and compare numbers. Another simple foldable was used to record our learning. One fold straight down the vertical center of the page….the partners rolled, built, wrote numbers and recorded the comparison symbol on the fold line.

Slide3

Tired of foldables yet? Here’s just one more……I pre-folded the paper. Students traced the fold lines, then we practiced modeling numbers in different forms. Looks simple, right? Not! Remember, these are 1st graders. Awesome 1st graders….that need to wiggle move and take their time to organize their work. We went over each section of the first number together and then students worked to display the different number forms for the last 2 numbers while I rotated around the room helping.

Creating foldables also provides the opportunity for students to listen for my voice and become accustomed to following directions. While our end products are organized well, it’s still the process of creating that gets us the most bang for our learning buck! And you should see the pride shining on their little faces when they see what they’re truly capable of doing! It’s amazing!

Slide4

Every once in a while, they let me hold the pen too…! Macrons (line placed over long vowels) and breves (indicates short vowel sound)…yep, we talk about those too!

Slide5

Writer’s workshop is moving right along! We’re enjoying Lucy Calkins lessons and are ALMOST done with our anchor chart. We’ve begun to publish, BUT have got to find the time to add the final step to our chart! That darn clock just keeps on ticking!

Wellllll, that’s what we’ve been up! What have you and your firsties been learning about? See ya again….real soon! =)

Sunday, August 31, 2014

First Week Jitters

Hellllo……is anybody out there? Can you hear me now…OR are you coming out of a first week coma too!?? I think I might've forgotten how much work goes into the first week of first grade! Don’t laugh….BUT it reminds me of child birth. Only the labor is spread out over an entire week! My bed is still perfectly made from a week ago because I never made it to sleep in it last week! I dropped as soon as I could right onto the couch and found myself waking up there each morning. Thank God for a charged iphone battery and SEVERAL morning alarms!

fiveforfriday2_thumb[3][1]

Now that I’ve regained a little of my senses, I’m checking in with Kacey for a little Five for Friday catching up!

Slide1
With each passing day, routines and procedures began to take shape. Our first crack at building stamina lasted for a whole whopping 30 seconds! I was flipping cartwheels (in my imagination) by Friday for having built it up to a whole 7 minutes!

I usually draw our anchor charts, but with the sonshine having started his first football season the same time as school, well……ain’t nobody got time for that! Clipart spruced up our anchor chart and to keep them uniform, I’ll be printing pictures for all 5 of them.

Slide2

I did, however, whip out this little guy over a cup of yogurt Tuesday morning! This chart was definitely the class favorite of the week. We’ve learned that we can do tough stuff without quitting or giving up! There were lots of smiles as we raised our arms to flex our muscles before practicing read to self each day…

Slide3

By Friday….we had gotten to know each other a little better and were ready to be on our feet for some learning fun. We used Dr. Jean’s Rhythm rhyme to generate a list of rhyming words. These little items came from Lakeshore Learning’s rhyming basket. Each student was given an object to “hide” in their hands. When I gave them the signal “ready…rhyme” they walked around the room to find their matching rhyming partner. 

Learning on our feet? Fun!

Slide4

Later that day, we also learned how to format our math journals. The sheet of chart paper is laminated. Each day, I’ll write and wipe 4 spiral review topics for students to copy and complete in their math journals. Because this was our intro lesson….we worked through one square at a time. I covered the remaining squares with construction paper so they wouldn’t get overwhelmed. As students begin checking into math writing next week, they will work through all 4 squares at their own pace.

Introducing this activity whole group allowed  me to see who has trouble copying too. Now, I know how many students I will need to provide a copy to glue into their journal.

Slide5

….and you know that last post? The one about the room set up? How happy I was with the finished product? Perfect plan…..? Ha! You know what happened the minute the kids showed up, right? Yep! I found out what really worked and what really did not! Kids know best…..and every afternoon, I tweaked things until we got to a format that will work best for all of us.

There’ll be no riding dead horses for us. What doesn’t work, gets tweaked until it does! 

I think this one is a winner!

Lesson plans included lots of Kindergarten review and time for getting to know one another.

Today was a day of rest….tomorrow, it’ll be time to prep for week 2! As we get ready to move full speed ahead, I thought it might be a good time for a little pick me up! A little something to help get energized….How about a fun Give Away? I can’t send you a caffeine boost, but I can help with adding a little fun to those fingertips as they work to mold little firsties!

photo

The first week is a wrap! Enter below to have a little fun and win some Jamberry nail wraps from my teaching bud, Dani! 


Saturday, June 14, 2014

The Daily Five~Chapters 3 & 4

There are 2 things that have had a BIG impact on the way I teach over the last two years…..reading blogs and The Daily Five. I’ll never dare to teach without either of them again! After seeing so much about The Daily Five online, I absolutely had to get my hands on the book and once I did, I read it furiously with highlighter and pen in hand. It simplified my literacy block. It helped me to work smarter, not harder and NOW…….guess what?! “The Sisters” are at it again! There’s a Second Edition!!! Whoop whoop!

The Daily Five has helped me to concentrate on research based practices that have my students purposefully concentrating on actual reading rather than on the “busy work” of things that are about reading. I love it and can’t imagine going back to anything else! This week’s focus for the book study is on Chapters 3 and 4.

Jennifer at First Grade Blue Skies has an awesome freebie that outlines The 10 Steps to Teaching and Learning Independence described in Chapter 3.


Step 1:  Identify What is to Be Taught
Simple, right? Know exactly what is to be taught. This is where Independence charts come in. These are anchor charts that will outline desired behaviors and should be created together as a class. The name of the Daily 5 choice goes at the top with a side labeled for student behaviors and one labeled for teacher responsibilities. This pattern is followed for the creation of each chart.

Slide5

Step 2:  Set a Purpose and Create a Sense of Urgency
I have a very deep need to know why I  have to do something. If I don’t understand why it’s important it becomes very low on the priority list. Students are no different, they want to know why what we’re asking of them is important. By setting a purpose for what you are doing through sharing objectives in kid-friendly language, students will see the relevance of it to their daily lives.


Step3:  Record Desired Behaviors on an I-Chart
Slide2 
Be sure to discuss the desired behaviors with your class as you are creating the chart. Guide this discussion in such a way that students take ownership over the creation of it and feel their input is valid.  For young children with little stamina, only add a few at a time.


Step 4:  Model Most-Desirable Behaviors
Modeling brings everything off the written page into 3D-real life application. Be sure to emphasize what will happen if we all follow these desired behaviors. We’ll each grow to become better readers!

Step 5:  Model Least-Desirable Behaviors, Then Most-Desirable Behaviors Again
The trick to this demonstration is to call on a student who often exhibits off-task behavior. By doing this, the student is getting the desired attention he or she wants and you have an opportunity in front of a watching audience to begin shaping his or her behaviors toward meeting expectations. Genius, right?! After the student has modeled unacceptable, off task behaviors, use this same student to model desired behaviors again. This begins to build the student’s muscle memory for doing the correct thing and grows confidence that they can indeed make the right choice.

Step 6:  Place Students Around the Room
The one question that guides students choice of seating is…. “Is this a place where I and others around me can be successful”? If the answer is no, the student must choose a different spot. If the answer is yes, students are seated and begin building stamina. Next year, we will call these success spots!

Step 7:  Practice and Build Stamina
Never let a timer or clock manage children’s pace. While it is suggested to begin practicing for only 3 minutes at a time, if you are using a timer or clock…use it for your eyes only. Let your student’s behavior guide the pace of practice. Keep track of it on a chart at the meeting area to show progress. I think this may be our very first bar type graph next year! In our classroom, after we practiced building our muscle memories and began following the actual routines of Daily 5 and guided reading, we then incorporated a timer to increase our sense of urgency for completing activities.

Step 8: Stay Out of the Way
The title says it all! Your goal is to build independent learners who are intrinsically motivated. You do not want their success to be tied to you hovering over them offering thanks and praise. You want their success to be tied to an individual, self-motivated feeling of accomplishment. Stand or sit near your guided reading table or the area where you will be pulling small group as you keep a watchful eye without making eye contact with students. STAY OUT OF THE WAY….it will be hard at first, but you can do it! Winking smile Once stamina is broken…once you can tell that they’ve given you the best they’ve got, return to the meeting area in your classroom.

Step 9:  Use a Quiet Signal to Bring Students Back to the Gathering Place
As soon as students begin to show their stamina is exhausted, have them each put their book boxes away and return to your classroom gathering place. The Quiet Signal is key to beginning this transition smoothly because all students will be moving throughout the room at the same time. In our classroom we use a rain stick. Once it turns, students immediately clean up their activity, put their book box away and are seated at the carpet. I do not call them to the carpet. This too, takes time to practice and learn, but because it is a quiet signal students must be working at a reasonable noise level in order to hear it and begin the transition. This transition period also serves as a quick brain break before the beginning of the next mini-lesson.

Step 10:  Conduct a Group Check-In; Ask, “How Did it Go?”
Once students have gathered in the meeting area, develop a hand signal for students to privately respond to answer this question. Last year, we used a thumbs up or thumbs sideways over our heart to indicate how we felt about building our stamina after practicing. “The Sisters” suggested using a method of holding up a certain number of fingers in response to this question. 1 indicated below standard, 2 indicated approaching standard, 3 indicated meeting standard and 4 indicated exceeding standard.

Never scold a student for how they respond. It is, after all, their judgment of how they just performed. If it isn’t an accurate reflection, ignoring the undesired response will often cause it to stop happening. Acknowledge how well they tried and use your class’ behavior as the deciding factor for what you do next.

          Slide1 Slide3 
What I’ve enjoyed the most about the new edition is the increased flexibility of how you implement Daily 5 in response to the individual needs present in your classroom.

Below is a brief list of things you will need to begin implementing The Daily 5 in your classroom:
  • The Quiet Signal
  • Chart Rack, Easel and/or Interactive Whiteboard
  • Tools to support stamina growth
  • Individual Student Book Boxes
  • A Gathering Place for Focus Lessons
  • Independence Charts
  • Classroom Design {that allows for choices of comfortable, successful seating}
 Slide4
Taking the time to implement the focus lessons at the beginning of the year, in detail, will set your class up for success throughout the year. It takes time, but it’s worth it. It’s worth it to build independent learners who are capable of making choices. Daily 5 is not a curriculum. It is a way of managing how you present your curriculum. It is a way of providing a student driven, student inspired, student led, positive classroom environment. It compliments the workshop model for balanced literacy. It’s a way of building a life-long love of literacy and enjoyment for what has easily become our favorite time of day!

Thanks for stopping by! Don’t forget to get your copy of the book. Be sure to check in with the ladies of Freeblicious to continue the book study! All are welcome to link up! Enjoy and happy reading!


Sunday, March 2, 2014

Fantastical Seusstastical March CURRENTLY

Hi, Friends! How are ya? I’m linking up with Farley at Oh Boy it’s 4th grade for this month’s CURRENTLY.  My wheel’s tend to turn best after dark, so I’m stopping in to share the SUPER silliness that took over our classroom last week.

Monday is Read Across America in celebration of Dr. Seuss’ birthday. We also have a spring Open House next week. In preparation for it, we celebrated with a fun Seuss author study a little early.

currently march2014

I love my little Barbaloots; we’ve been working hard and it’s time for some rest and relaxation. We’ve got 5 days ‘til spring break….BRING.IT.ON!!!

THINKING….YIKES, time flies! March morning work will be wrapped and ready for tomorrow. No worries.

WANTING…a day in between Saturday and Sunday, to actually REST! Saturday=housework. Sunday=worship and prepping for the week. Can we get a fun day in between, lol?!

NEEDING….{back to March morning work….}

?????……Seuss, shapes and fractions is the answer. Can you guess the question?

Slide3

There’s no way to read Dr. Seuss without playing with rhyme. We began the week with a little book titled Come Rhyme with Me, THEN went all in to every Dr. Seuss book we could get our hands on. I think I’ve finally got all of the knots out of my tongue…dedicating a week to alliteration and rhyme was FUN!

Slide4

Each of our sections of 1st grade, chose one book as the main focus for the week. Our class’ selection was The Lorax. This is our story map that we created after reading it. We also had fun comparing and contrasting the book to the movie.

Slide1

We created a quick reading response that crossed over into our math time too. {Cross curricular connections….yep, we’re all about that!} Students wrote to complete the sentence….If The Once-ler gave me the last truffula seed, I would…..

…then, traced and cut their handprints to use as the Lorax’s mustache. After creating the Lorax topper, we left the craft on our desks to dry and headed to lunch.

When we came back, students drew their open hand inside the illustration square at the top of the page. Their hand was drawn open in order to “catch” the truffula seed tossed down by The Once-ler.

With our math focus being shapes, student groups were assigned a plane shape or solid figure to trace, cut/assemble, and glue into the open hand drawn on their paper. The shape assigned was determined by the level of difficulty or extension students’ could handle in order to deepen learning of geometric shapes because they would have to then discuss attributes and sort by 2D or 3D. Here’s a closer look….

Slide2

After we caught and planted truffula seeds in math, the next day….guess what?! They sprouted in our library corner! Those seeds grow fast!

Slide10

Lots of oooooohs and ahhhhhs were heard and interest in the reading corner is renewed at a time in the year when lots of ants are in 1st graders pants, lol!

Slide5

Students continued making connections during literacy stations throughout the week. Have I mentioned how much I love my kids yet?! I DO! I sooo DO! When one of them started waving his paper at me from across the room, I knew there were sparks flying in that head of his. Sure enough, I walk over and he’s illustrating more shapes at the writing station….discussing attributes with his stations buddy and REACHING WAY beyond the truffula seed to real world examples. ***LOVE the way they think!!!***

Slide6  Slide7

By Friday, we were ready for Show, NOT tell….students brought in real world examples and kept them hidden inside of a brown paper bag. After giving their classmates clues to reinforce the learning of attributes and get in more of that math language, guesses were made and the shape or figure was revealed. This smart cookie made sure to write his clues on his bag so he wouldn’t forget! =)

Slide8  Slide9

Friday was such a frenzy of a fun, exciting kind of day….annnnd they did such an amazing job sharing, we completely ran out of time, so we’ll continue to Show, NOT tell on Monday.

Slide11

And the Lorax will be there to welcome them back!

Slide12

Big ole hairy mustache and all….we’ll start Monday out having a ball!

 Slide2

Getting ready to have a rhyme time kinda week of your own? Click the pic above to grab a freebie to add to your fun!


LinkWithin

Related Posts Plugin for WordPress, Blogger...